This is a guide that WILL be updated and I will try to have it as complete as possible.
it will be your guide how to handle all different physical disks, Diskimages etc in WinUAE to be used to transfer to a real Amiga aswell. All from handling old harddrives from an Amiga, to use new devices etc.
This guide take one thing for granted. you already have one Workbench installation done on your machine in UAE.
How to prep a new disk, USB/CF etc.
If you buy a new disk, they are usually preformatted and this will stop you from be able to use it in WinUAE as windows want to handle the disk. we need to clean it. so insert your card in your machine. (NOTE: some CF/SD card readers will not work in WinUAE. if you have issues get another reader)
Usually it will pop a window telling something like “USB Drive (F:)” or so showing the content of that disk.
make sure you can erase all this.
Press your windowskey and R to get the “run” prompt. where you enter “Diskpart”

and choose “ok”, Press “yes” at the UAC Prompt and you will end up with something like:

Write “List disk” and press enter:

here you can see that disk 5 is a 8GB disk, and it fits my SD card I just added. so I write “Select Disk 5”

make sure you are on the correct disk as next step WILL erase the disk so if you by misstake take one of your PC disks. do NOT blame me!
to erase the disk. just write the command “Clean”

Here you can see it failed first time. as the machine had the “F:” window still open. had to close it first.
NOW however you can use this disk in the next step “Amiga formatted / Empty disk”
Close the “Diskpart” window.
Use your Amiga formatted disk / Empty disk.
This is the next step. if you have a empty disk (like cleaned like above) or an Amiga formatted disk.
as above. SOME adapters (PATA / SCSI ) will have issues with WinUAE. if you you will need to find another adapter.
Anyway. simple add your disk to whatever controller you have on your machine. being a PATA Controller USB, PCI, PCIe whatever doesn’t really matter.
Now you just start WinUAE as admin. by rightclick on it

Choose “yes” on the UAC Window popping up! Now when you click on “CD & Hard drives”

Click on “Add Hard Drive”

Click the “pull down” menu to the right of “Hard drive”

if you like me have a empty disk you will see a [UNK] disk if the size you have. if it is an Amiga formatted disk it will say [RDB] both are equally ok. just select it. and then “Add hard drive”

you now have a harddrive in UAE that you can use as if it is an Image or so..
So now go to “Configurations” and go to your preffered ready WinUAE config you have and click on it and “Load”.
This loads the config. now go to “CD & Hard drives” and add the harddrive as you did above.

this is how it looks like fo rme. where my SYS: partition is a directory on my PC. DH0 is a share on my server and then you can see the harddrive I just added. now Start UAE by klicking “Start”
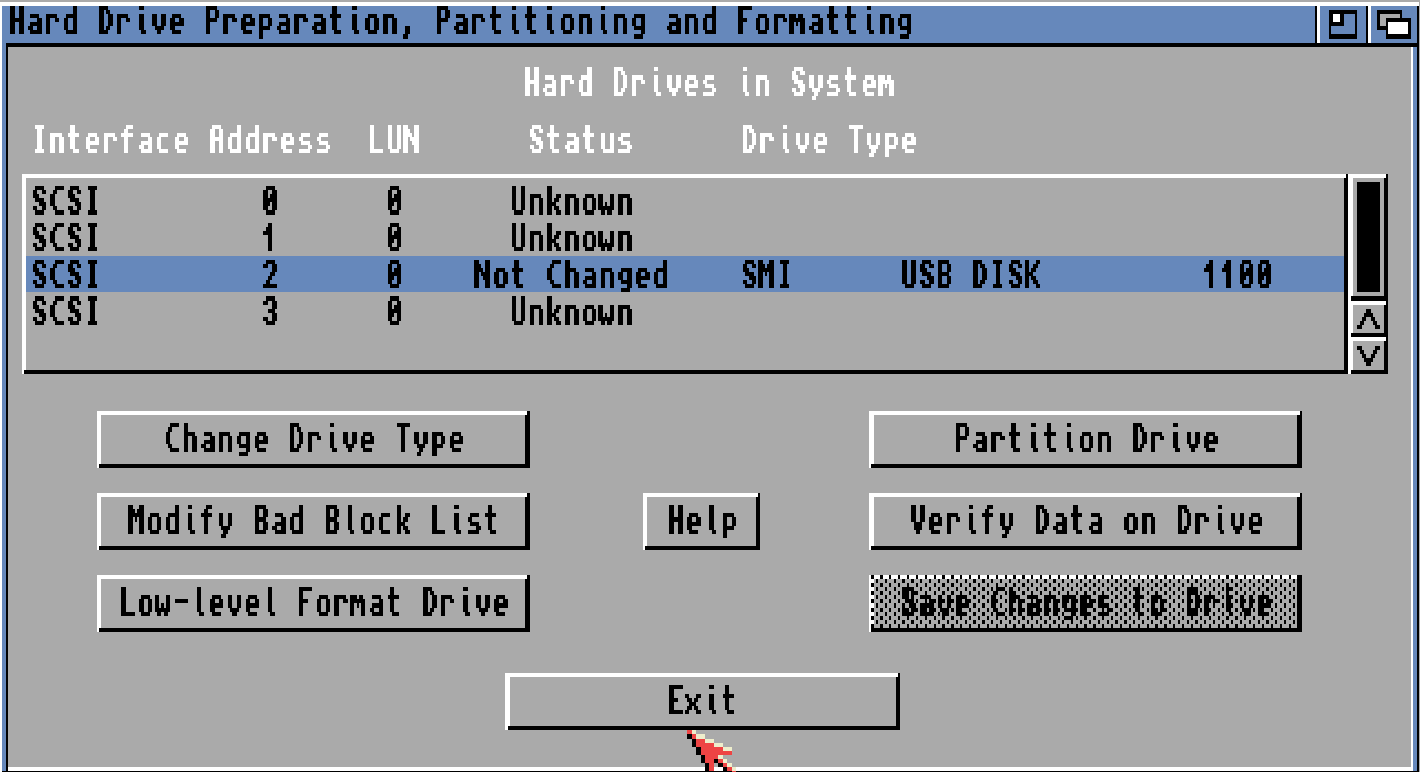
my UAE is up! lets partition the disk.
go into your WB disk, Tools, click ONCE on HD Toolbox hold down right mousebutton go to the “Icon” menu and choose “Information”
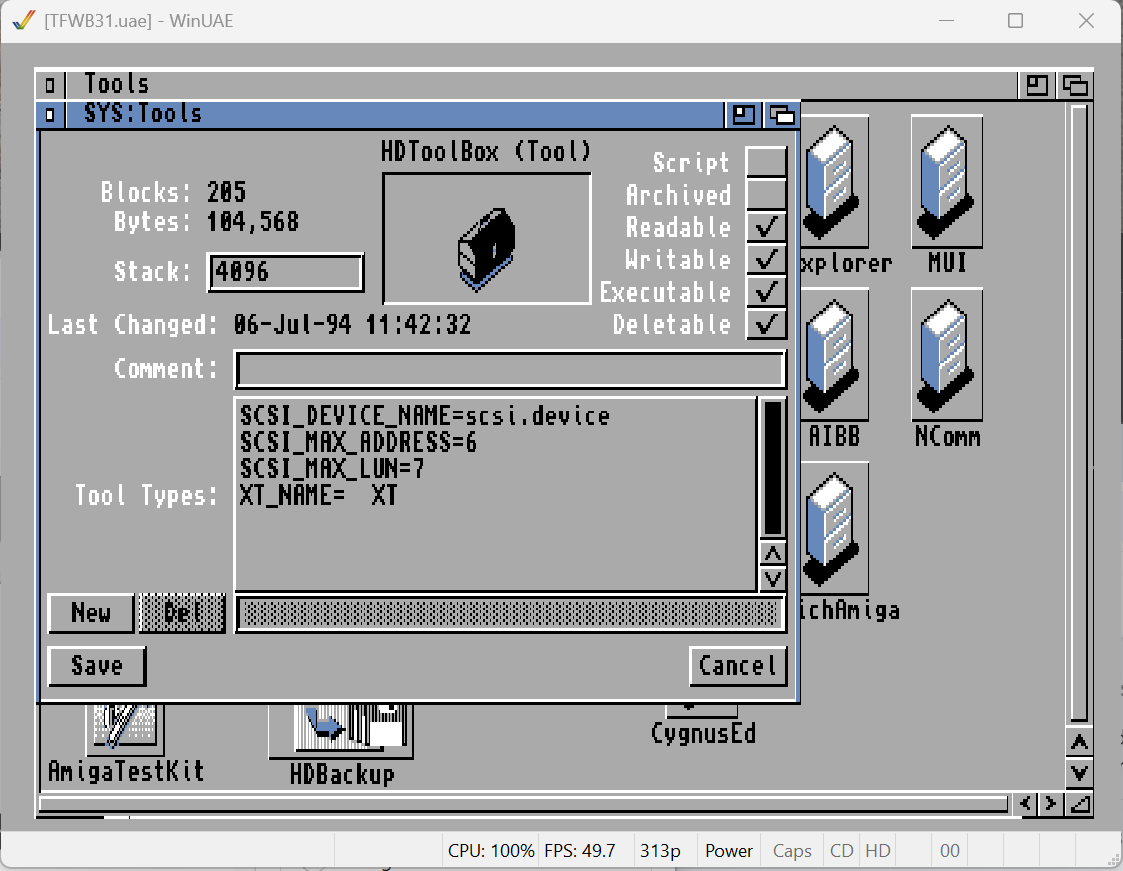
Click on the line saying “SCSI_DEVICE_NAME” and change the name to uaehf.device.

and press save. This changes so your hdtoolbox will actually use the UAE device.
if you now doubleclick “HDToolbox” you might see something like:
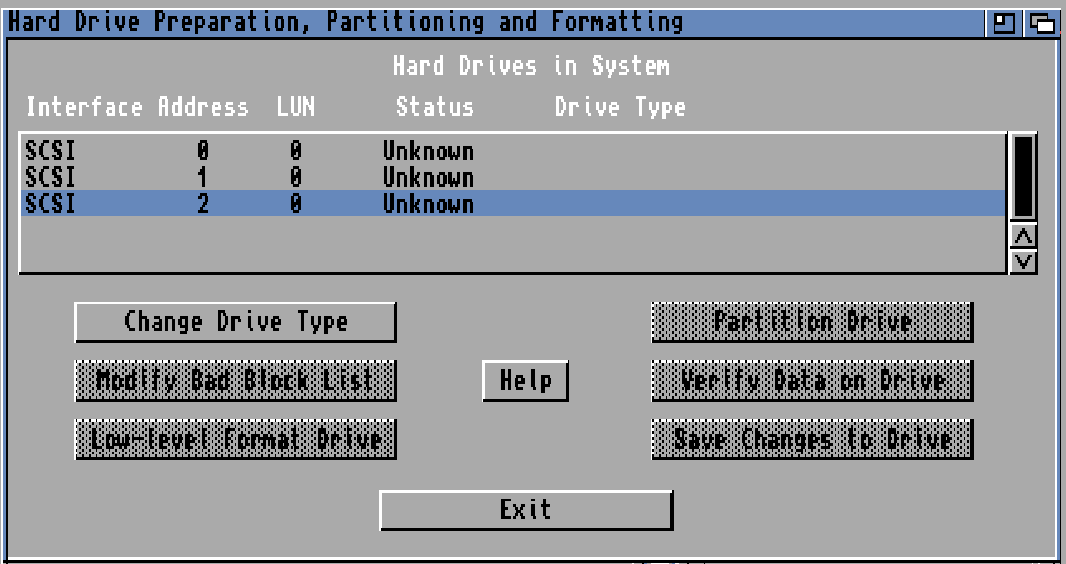
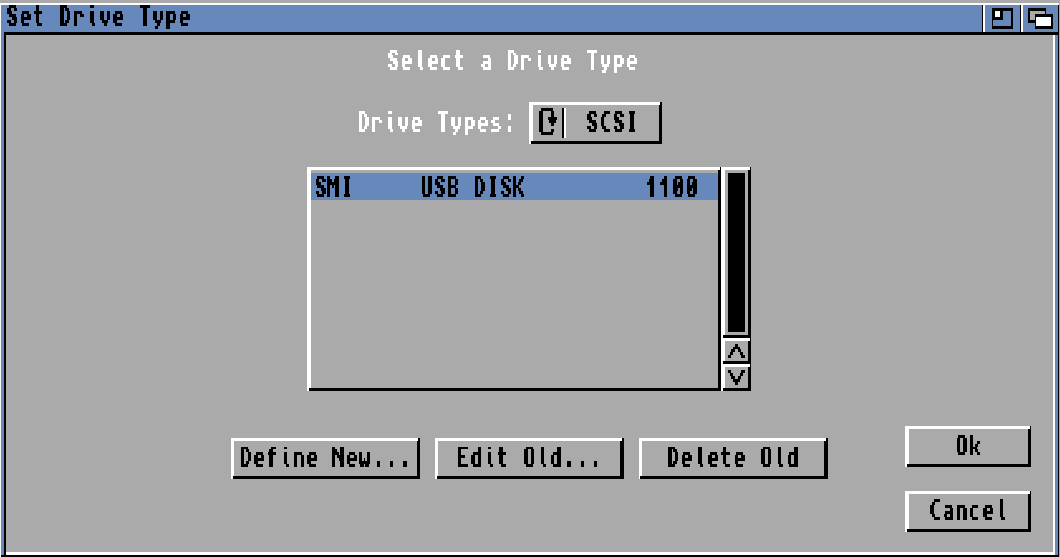
and this is confusing. but this is all your “harddrives” you have in your config. and as I use directories instead of images it will pop up as “unknown” I however know it was the last disk I added. so chose it and “Change drive type”.
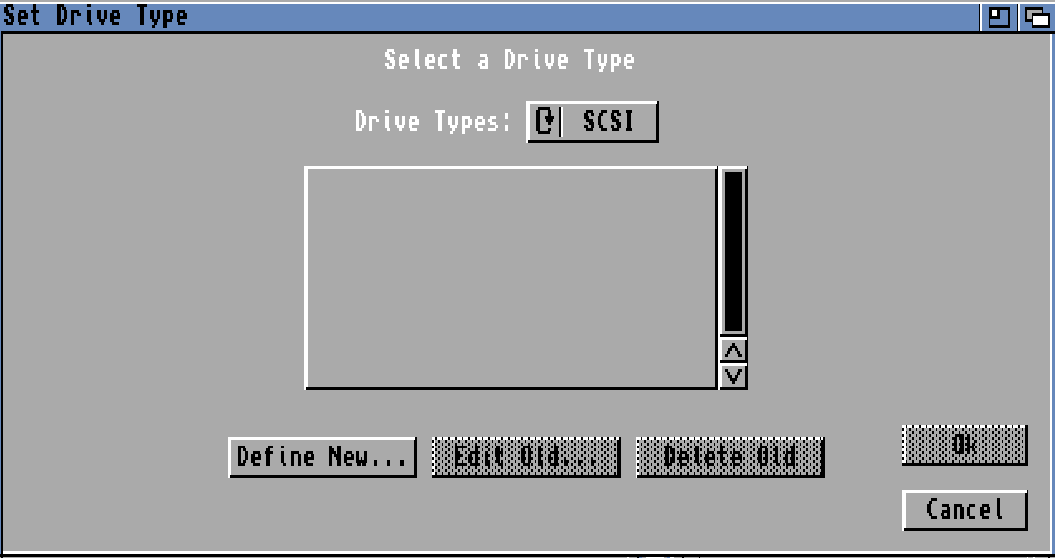
Click “Define new”
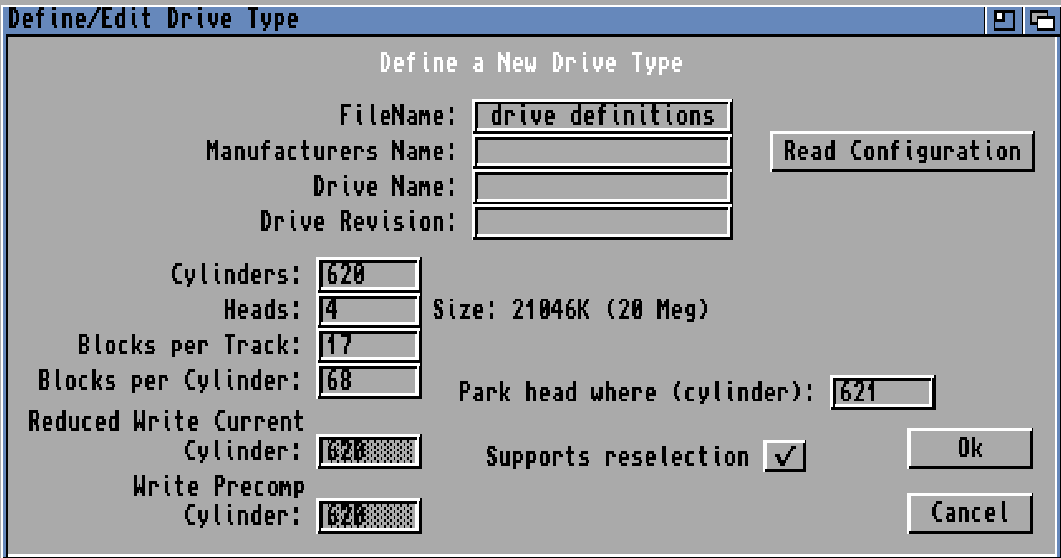
Click “Read Configuration”

Continue
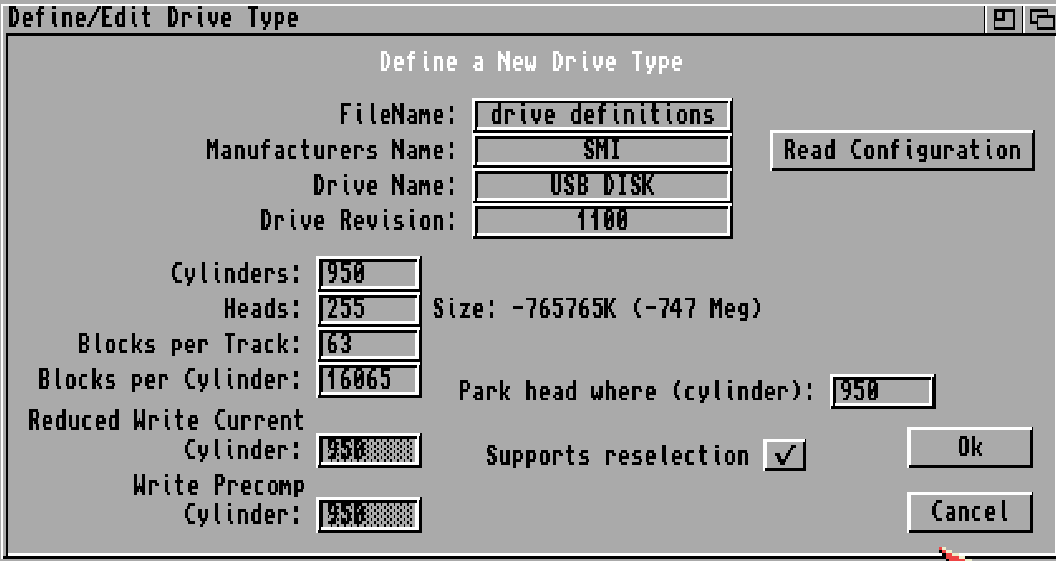
AAAAAND here it starts to get interesting. you see my disk above is correct., but the SIZE? yes this is an issue as 3.1 does not have support for too large disks. usually this will work fine however. (3.1.4 and up have better support for larger disks) this is usually just a “Showing the wrong info” situation so press “Ok”
HOWEVER! if you want to use large disks you will need to use a modern patched scsi.device for your machine. this is outside the scope for this guide! OR use 3.1.4 or newer.
Same with that it can be a good idea to combine with new filesystems like PFS or SFS. Especially on 3.1 to get around the 4GB Issue. More about that later in this guide if it is something you want to do. Under “Different Filesystems”
and OK again
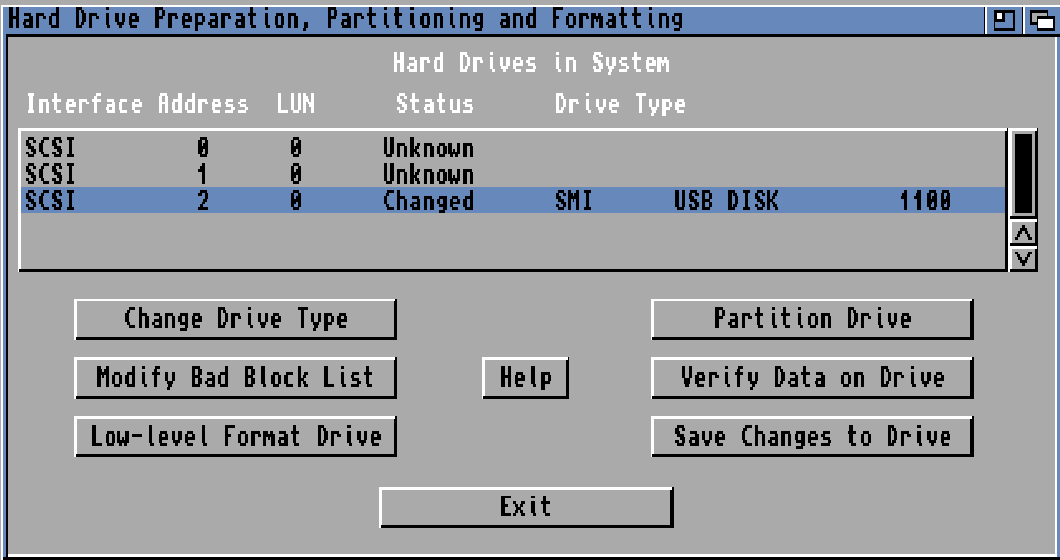
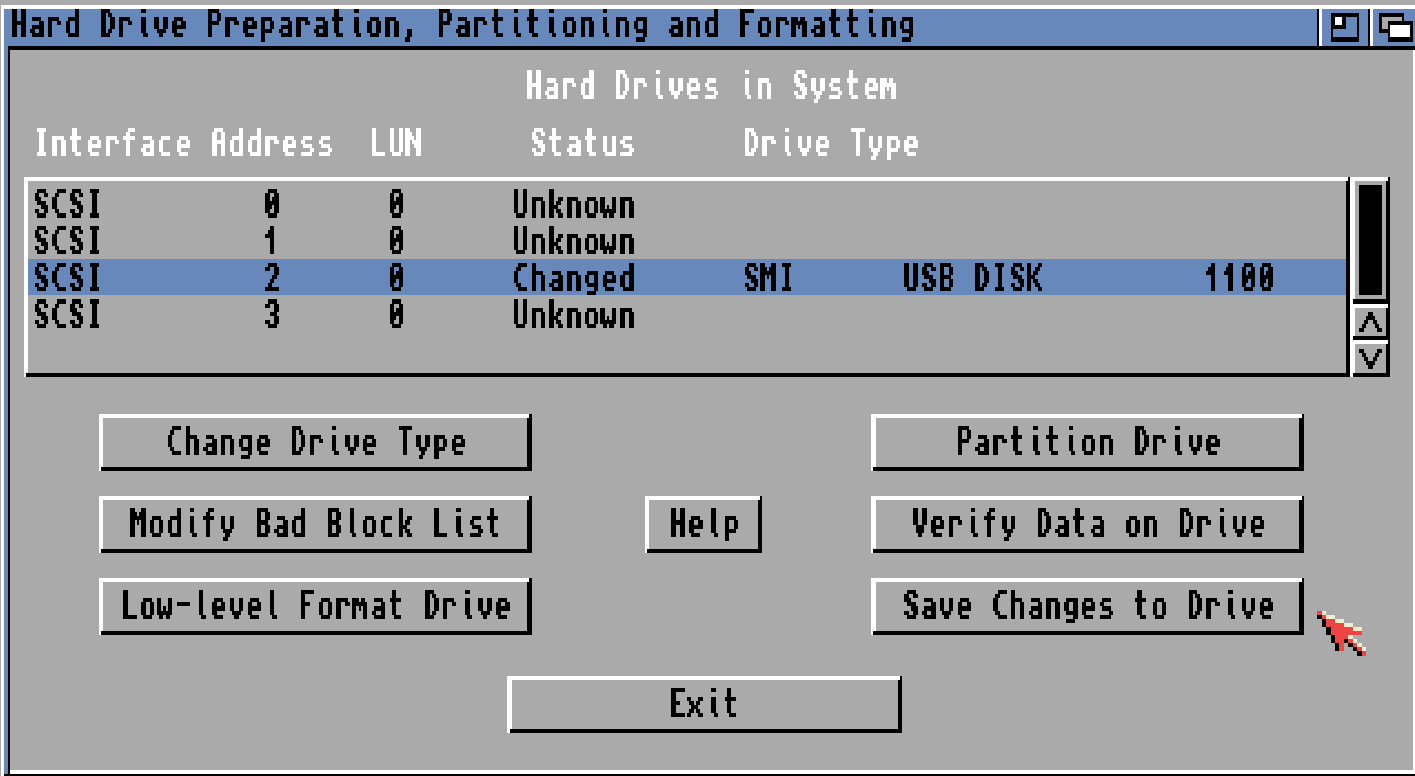
Now you can see the disk, press “Partition Drive”
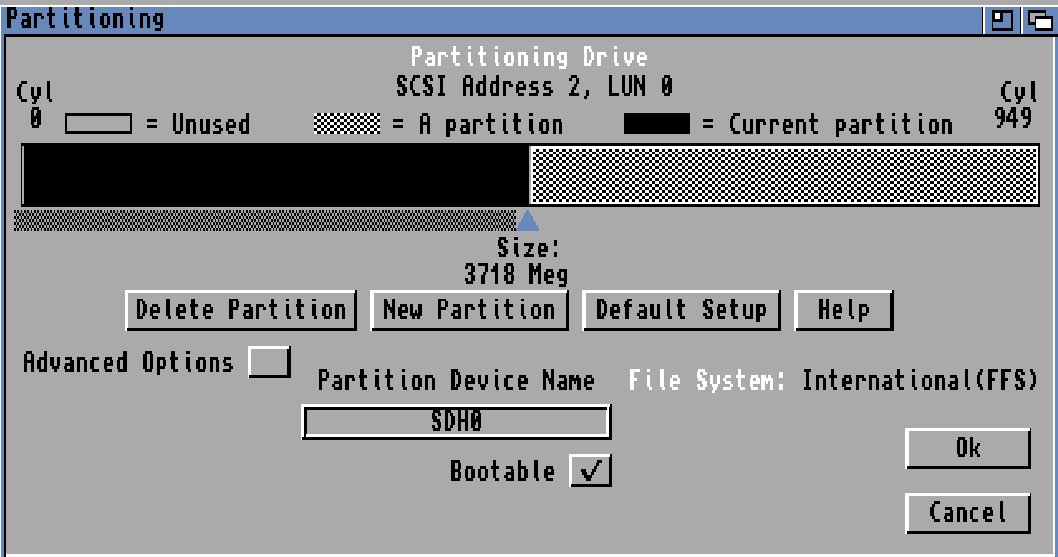
Click “Advanced options” and have as a habit especially using 3.1 to have a bootdisk SMALLER then 2GB. so I will shrink it and actually delete the other partition. as “partitioning disks” is not in the scope of this guide. (I think).

HOWEVER Click on “Change” and lets talk about settings.
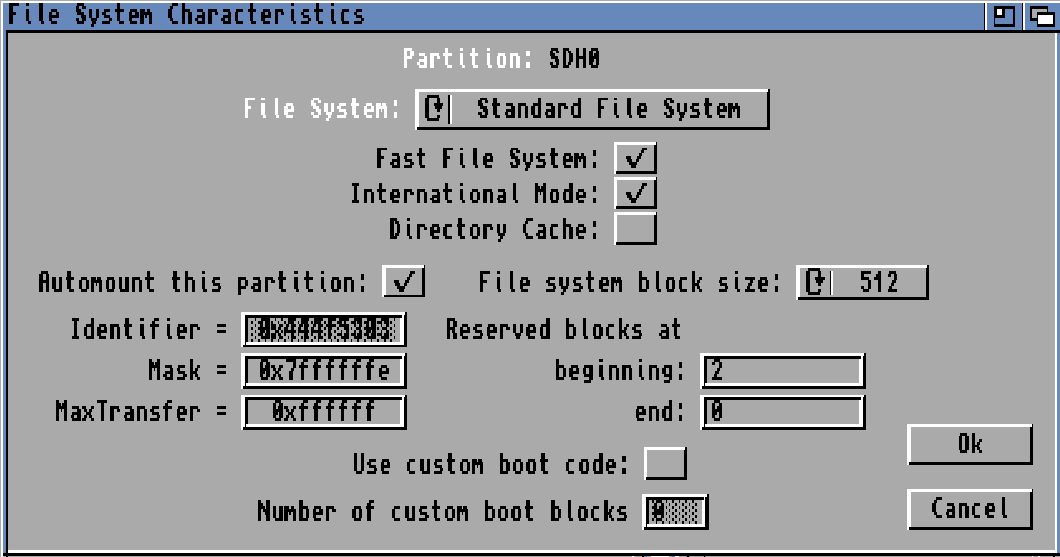
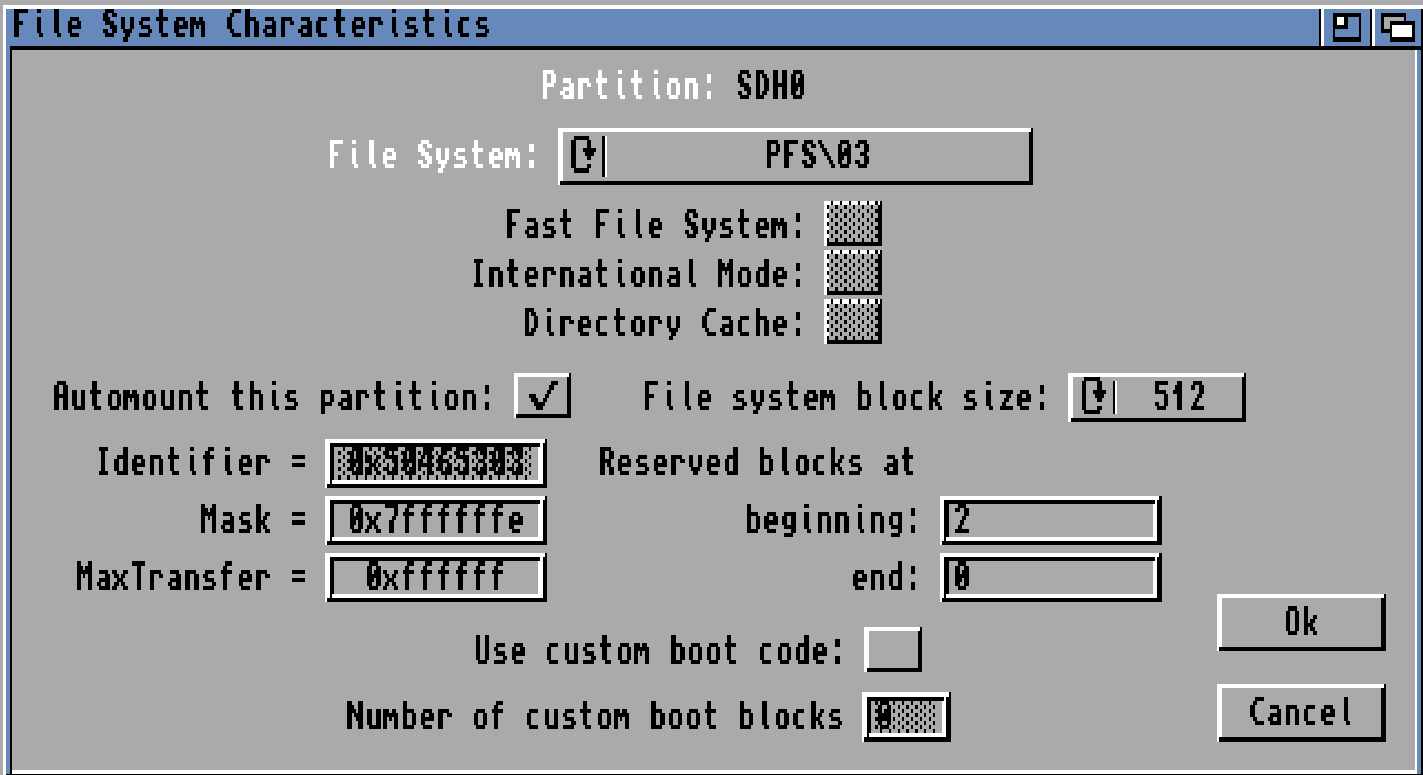
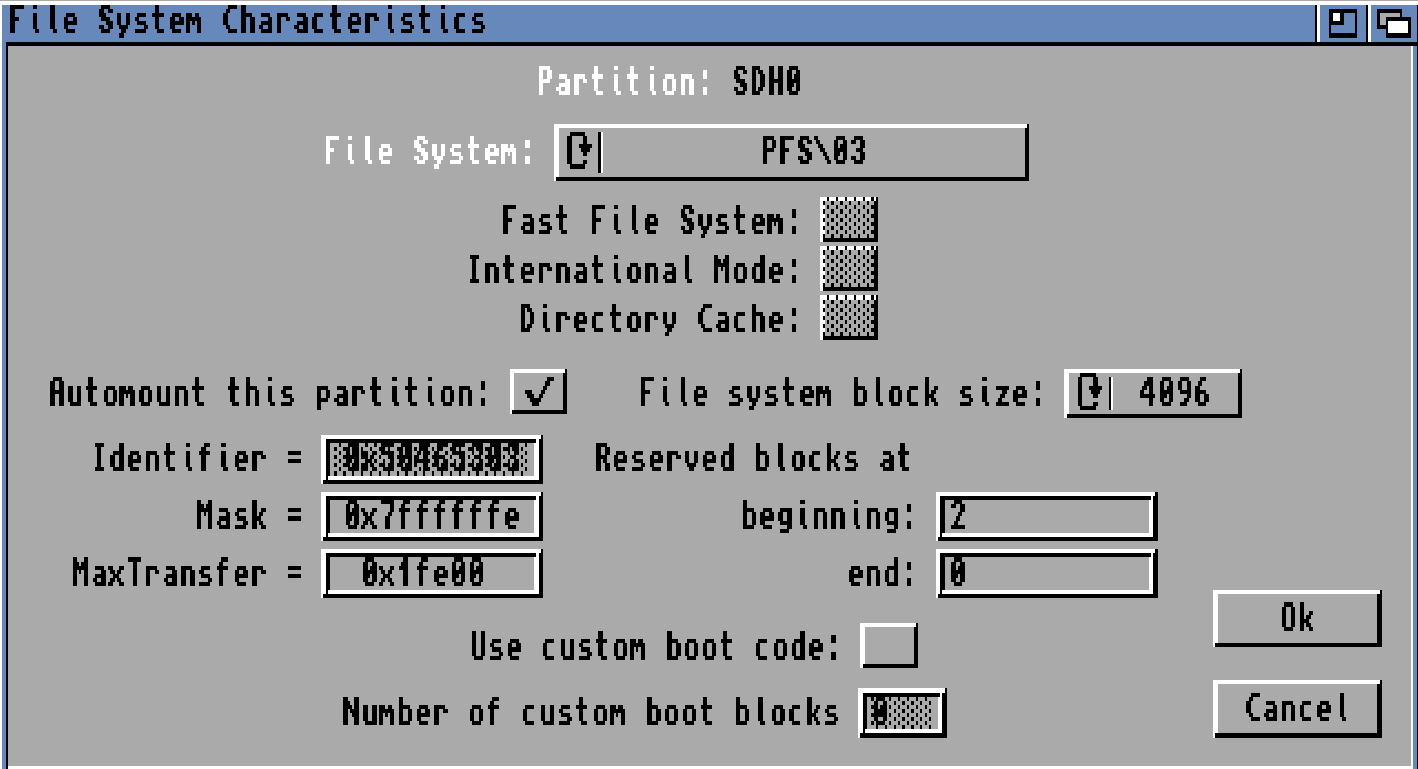
File system block size: this is the smallest space a file can take. as data is used as “blocks” on a disk. larger blocks uses less ram (if you notice ALOT of ram is used with your large disk, change blocksize)
large blocksize can improve diskspeed but as this is the smallest size a file can take. even a 1 byte file will consume the blocksize of space. however with today large disks, this is not a big issue. so I recommend something like 4096 (4k) (you CANNOT change this after without formatting your disk)
Mask:
This tells the machine what boundaries your HD controller and DMA Hardware can handle.
Usual setting is 0x7FFFFFFE and generally works for all.
Maxtransfer sets the maximum amount of data AmigaOS is allowed to read or write in a single disk operation. a common and working setting is: 0x1FE00

Press “OK”. Now check all info. you have your partitions ok, Partition name (SDH0 in my case) . you have your boot disk selected as “bootable”. Remember you can choose ANY Partitionname. I have used SDH0: here for simplicity. you can use anyting. DH0: is recomended as first disk. and this can be changed without loosing data. (However you cannot change size!)
IF you have several with the same name. the OS will temporary rename it. you can see that with the “info” command in CLI. but what name you use are all up to you!.
(BUT renaming this MIGHT make your software with hardcoded paths screw up so think before installing software)
Short about Boot priority: the machine will boot from the device with the highest boot priority. so you can have several bootable disks, but that one with higest prio will boot. but with several bootable disks you can have them listed in early startup menu. (hold down both mousebuttons at poweron/reset)
Buffers is how much memory the Amiga use to buffer data. higher CAN sometimes improve speed on slower disks (but consumes more RAM)
Anyway. when ok, choose “OK”
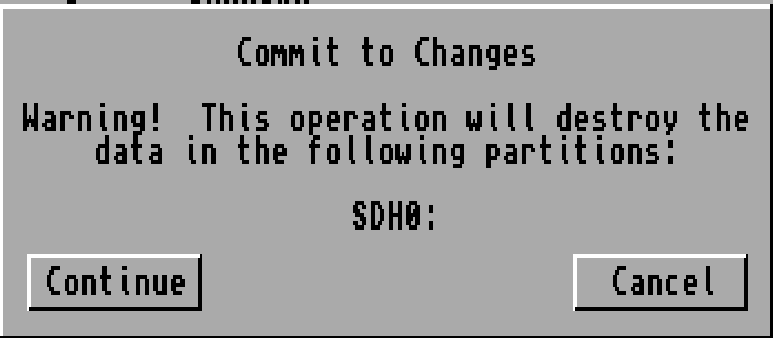
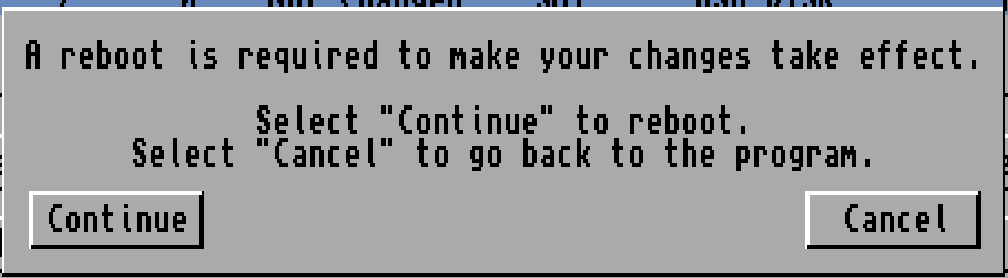
and “Save changes to Drive”
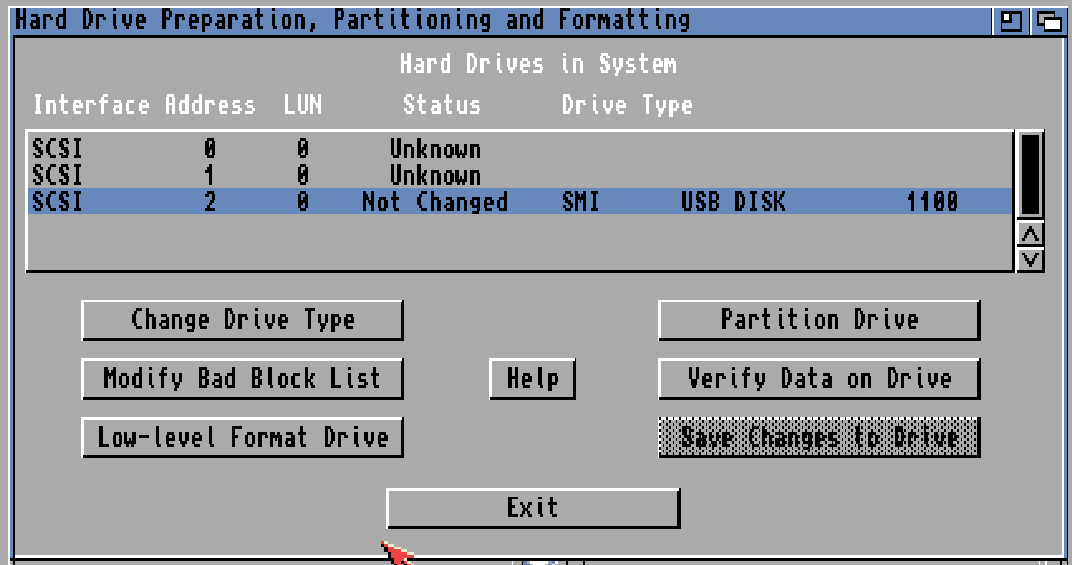
This will grey out “Save Changes to Drive” when done. Click “Exit”. if you made any changes to partitions etc you will need to reset your machine. so reset it.
And your machine will reset
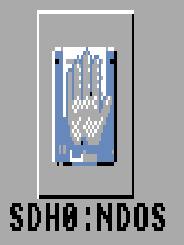
You will now see an extra icon (sometimes it can take some seconds for it to pop up)

Click on it and hold down the right mousebutton and choose menu “Icon” and “format drive”
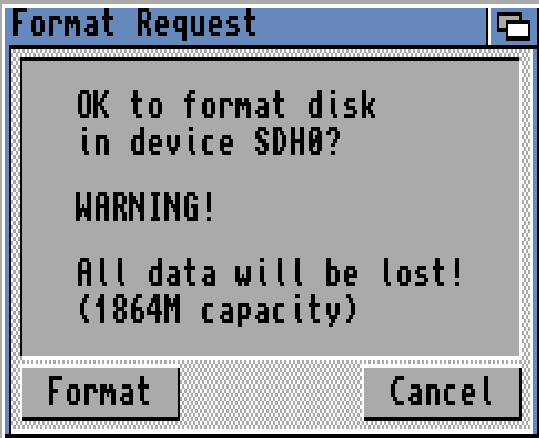
give it a proper name and format it. I always use “quick format” as it is pointless to do the long slow one.
the slower might check your drive more but modern disks are fine.

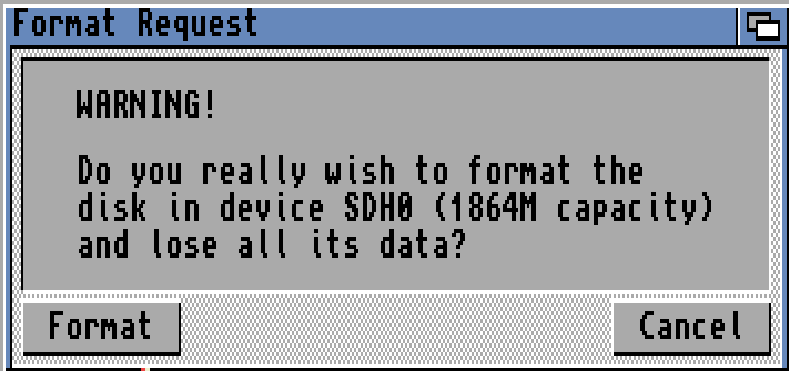
Format.

YES! FORMAT! and voila. your disk is ready! and can be used on an Amiga.
ok given it for the moment is empty. you can now either install it from UAE to this disk or copy an existing UAE install to it.
to copy your existing UAE setup to it just start a CLI prompt and write:
(System, Shell)

This copy from SYS: (the disk you booted from) to SDH0: (that you just made) copy all files, clone settings and be quiet.
when done. you can put this disk in your amiga. power on and it will boot just fine.
And as I install my WB in a directory instead of an Image in UAE. I can easy copy files from my Windows folder to the UAE folder and by that method have a easy way of copy files from windows to my Amiga.
if you want to copy your physical Amiga to UAE. I would recomend adding a disk in uae as a directory. call it “backup”. if you press “F12” when UAE is up you can edit your settings.
Lets do that.

Click “Add Directory or Archive”. and

Device name “BCK” will name it BCK: just like SDH0: above.
with the name “Backup” and all files will be at C:\UAE\BackupDisk.
I have chosen “bootable” with bootprio 0. it is up to you. this can be changed later.
Press OK and OK. and reboot and you will have an icon for that disk aswell.
so now you can copy your data from your physical Amiga disk with diropus or why not from CLI:
Command “info” will tell you what disks you have:

Sizes are WAAAAY off due to 3.1 🙂
so I want to copy from my Amigadisk “SDH0:” to my backup I just created:

Copy SDH0: BCK: all clone quiet
will copy everyting from SDH0: to BCK:
and now in Windows:

All is there. and I can open it from windows if needed. I can compress to .ZIP or whatever.
OR do new WinUAE config and point to that as my boot disk, and UAE will boot from it.
how about IMAGEFILES??
YES a legit question. some people want to use image files instead of directories. (and they can also be used for stuff like bluescsi)
lets show how to create a imagefile in WinUAE.
Start WinUAE (no need to do as admin unless you want to add a physical disk)
CD & Hard drives

Add Hardfile.

At bottom enter the size of the image you want to do in MB and click “Create”
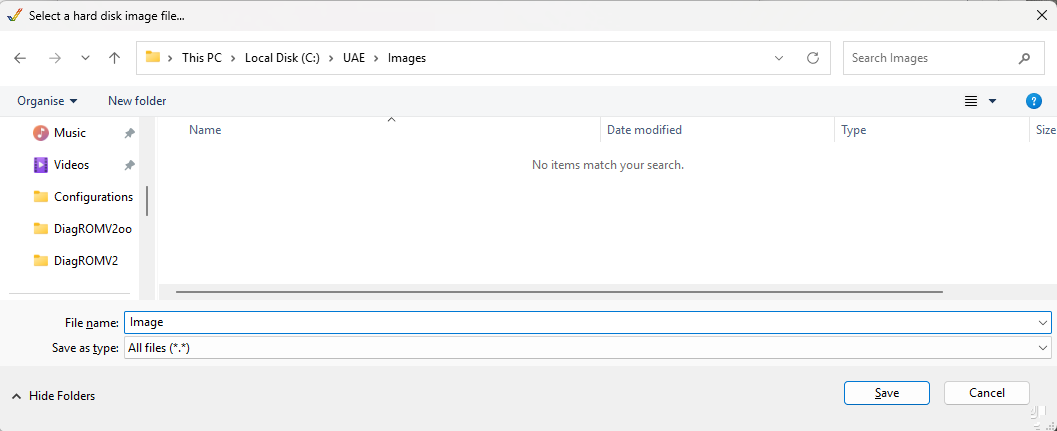
Select where to locate it.. and “Save”

I choose “Full drive/RDB mode” and OK

and it can now be used as any disk above here.
how do I transfer an image to a physical disk?
well. 2 ways. either you add the image and harddrive with methods above and just copy the data.
OR you use a diskimager software like https://sourceforge.net/projects/win32diskimager/

Where you point to the image file. the disk you want to copy to/from
and “read” to read from the disk to image. or “write” to write the image to your disk.
BUT this have a severe drawback: if your drivesize differes it will not work. if you write a 1GB image to a 4GB disk. your drive in Amiga WILL be 1GB and resize is not an option.
by setting up 2 images in UAE above you can copy and have different seizes.
A note about uaehf.device.
IF you look at images/harddrives etc you will see a small option:

here you actually CAN change it to use scsi.device instead of uaehf.device. INCLUDING all sizeissues you will have on a real machine.. only recomended for the more experienced user.. or if you want to “play around” with it
Different filesystems
There are updated filesystems for the Amiga. one popular is “PFS” so lets add that.
I google “pfsaio amiga download” and get to: https://aminet.net/package/disk/misc/pfs3aio
download that to your PC.
I now have my file at: C:\Users\John\Downloads\data\
so I add it as a temporary harddrive in uae:
F12 for config.
CD & Hard Drives, Add directory or archive
Select “Select Archive or Plain File”
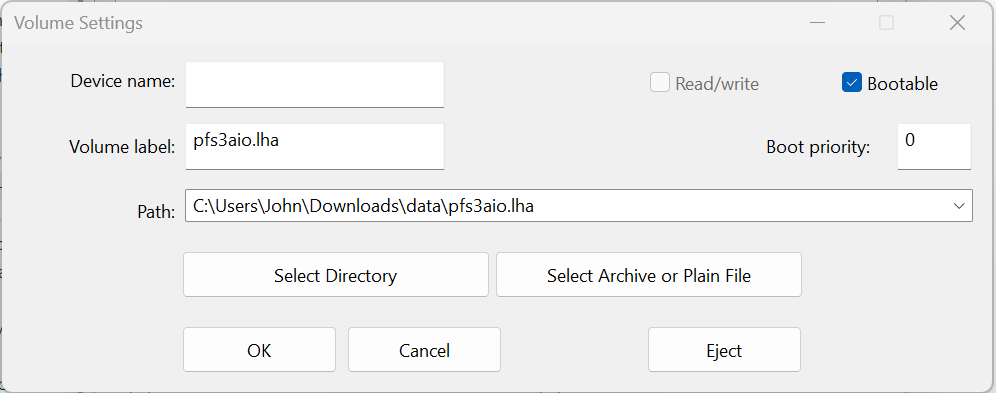
Choose the archive file, volume label is automatically filled. and OK

now OK in WinUAE and restart your machine (CTRL+Windows+Windows).
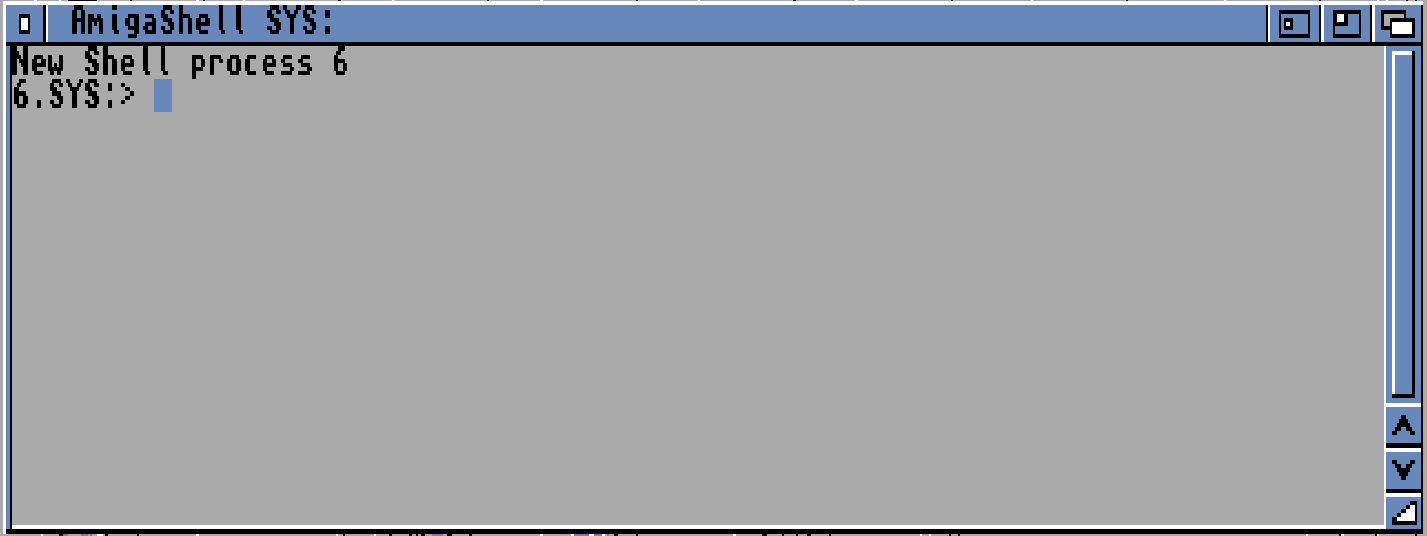
lets “Install” it. Start a CLI prompt:
Your workkbench -> System -> Shell
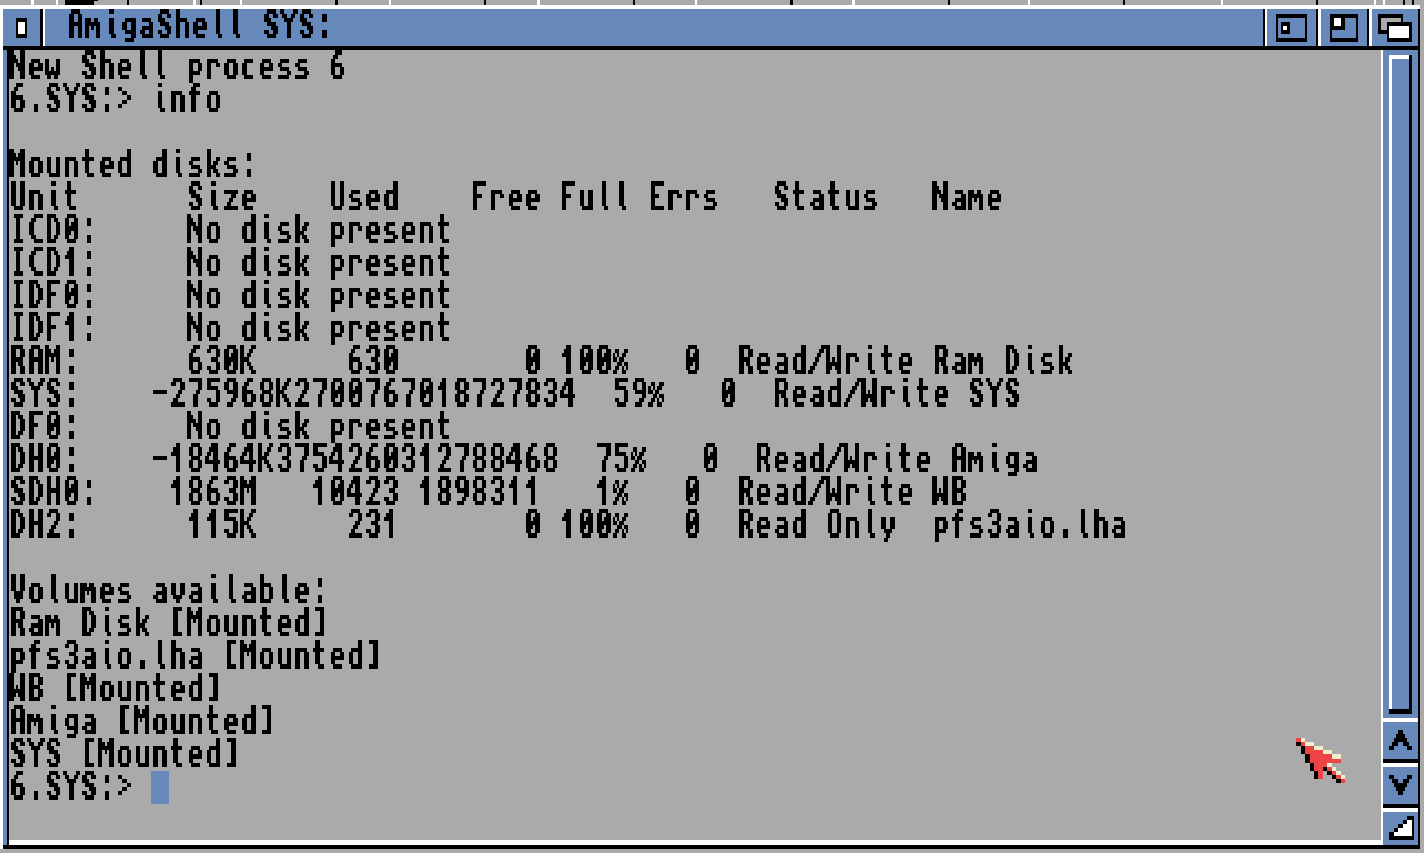
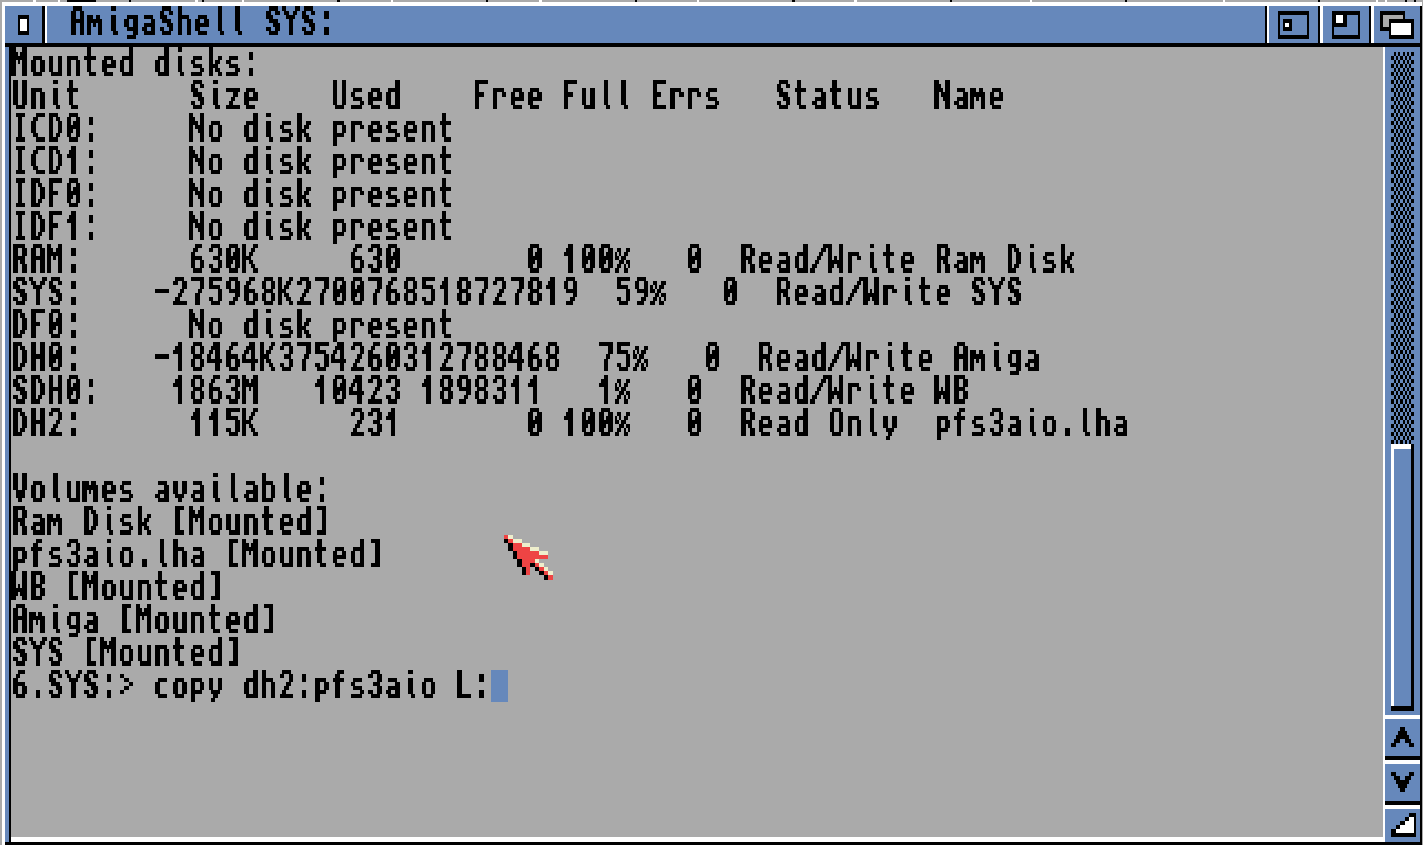
write “info” and return and see that your pfs3aio.lha HD is at DH2:
so you write copy dh2:pfs3aio L: and return (can be lowercase l. write it as uppercase for ease-of-read)
when this is done. you can close this window.
Now go to your Workbench, Tools, HDToolbox (if no drives are listed. you did not do that uaehf.device change as told above!)
this MIGHT pop up:
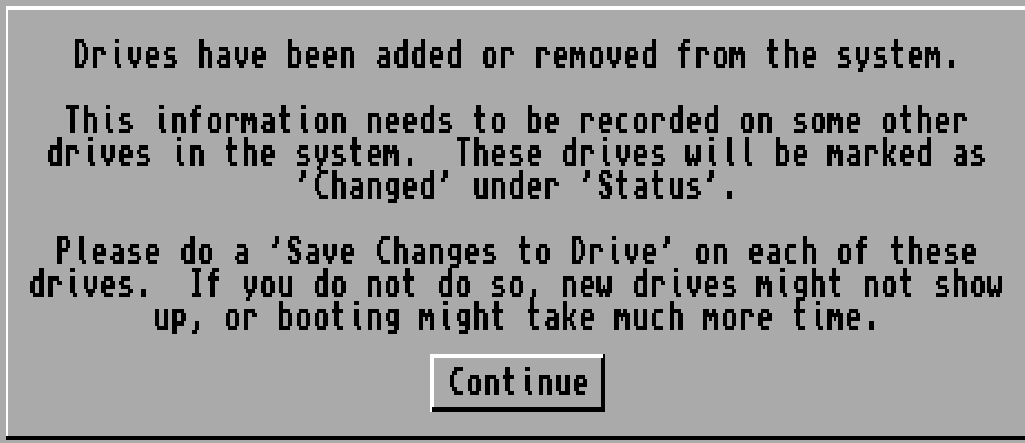
this is due to our extra HD. Continue
and for me.. YES

it was added. lets just ignore that! we will work on the “SMI” disk. So click on it and Partition Drive
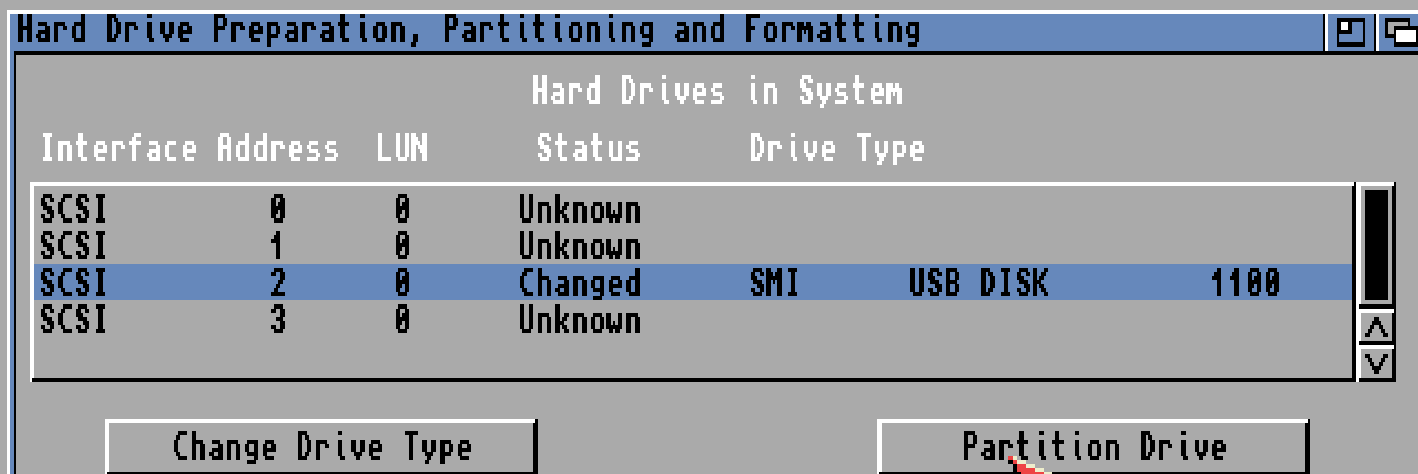
Here we have our disk we prepped. lets install and use PFS instead. (this WILL erase all data on that partition)
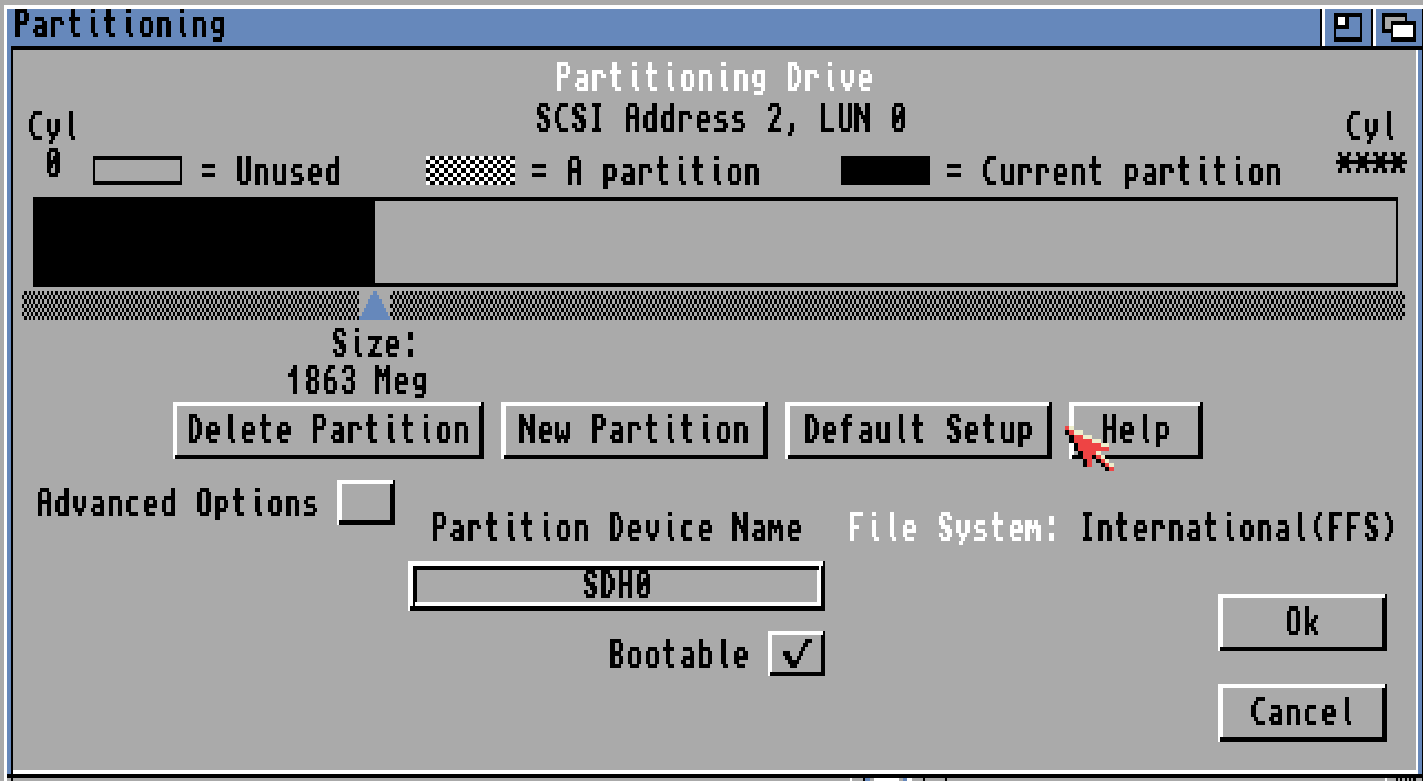
Click “Advanced options”
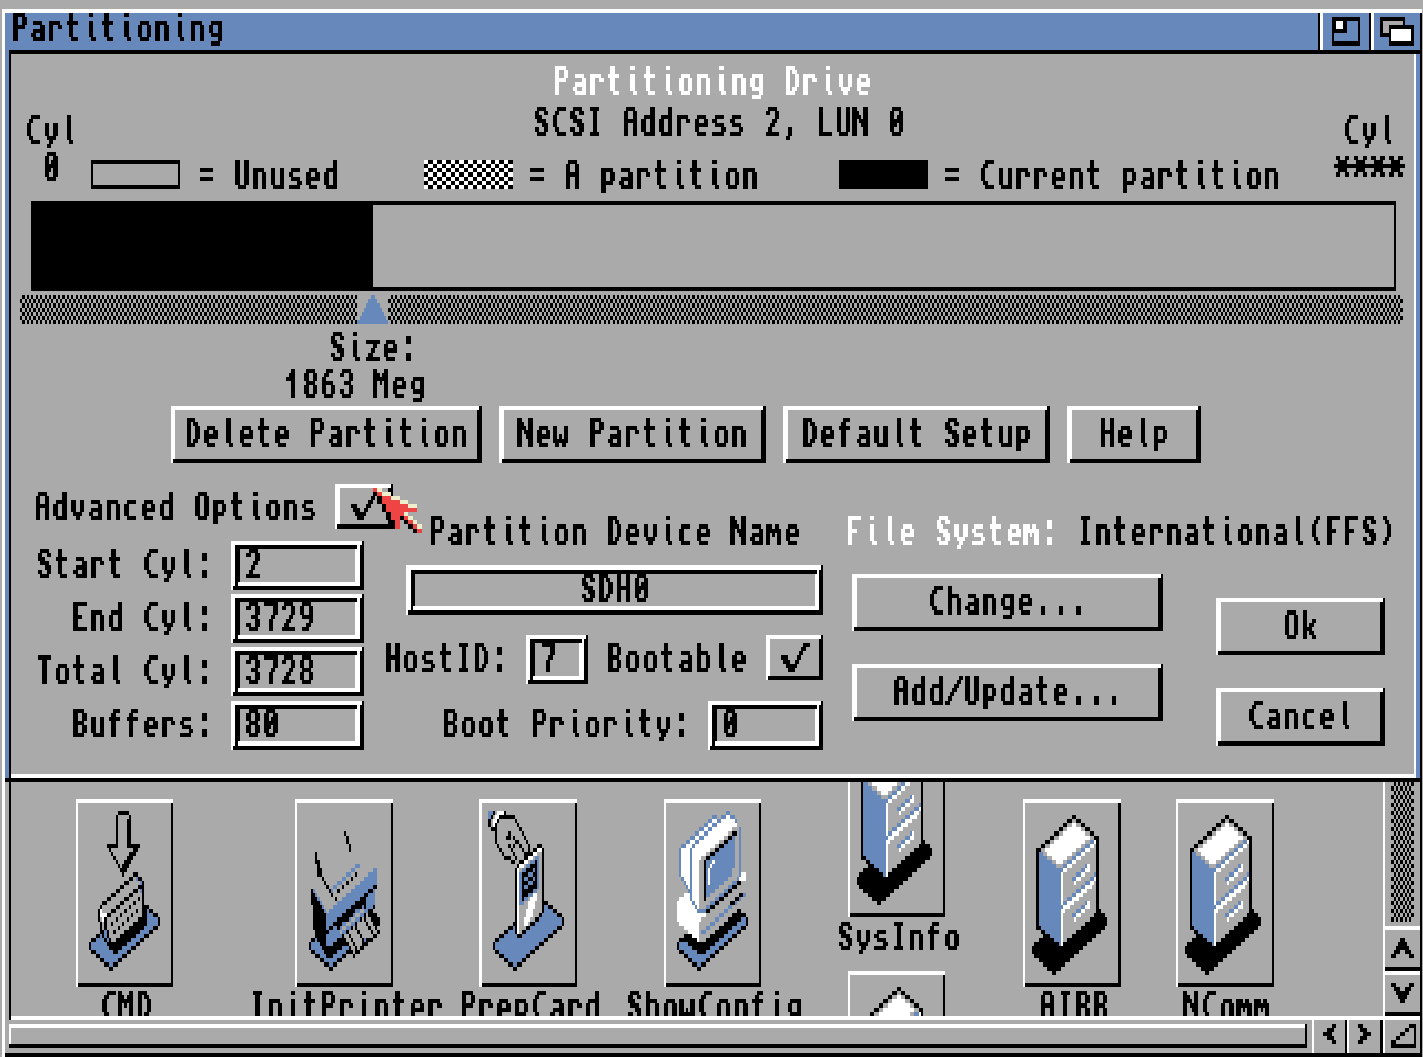
Click “Add/Update”
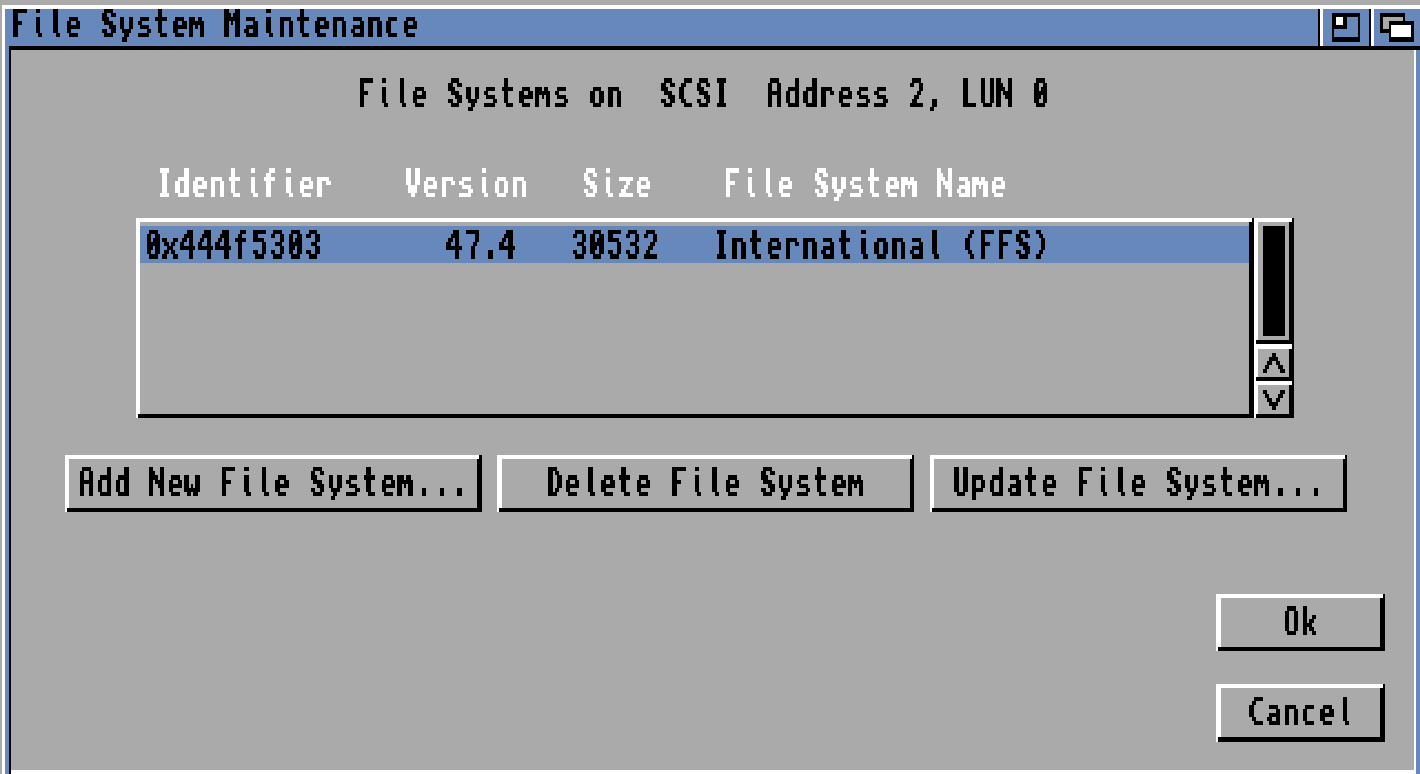
“Add new file system”
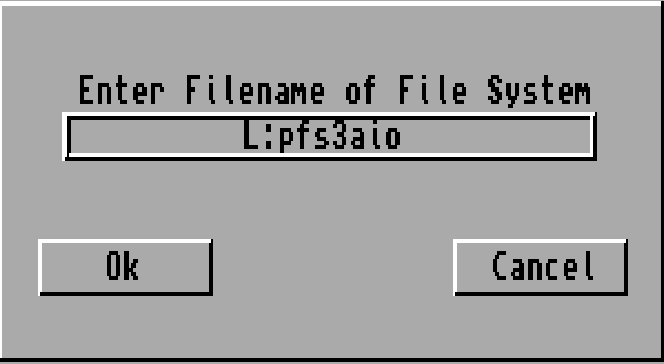
enter L:pfs3aio (you can use lowercase) and OK
as dostype use: 0x50465303
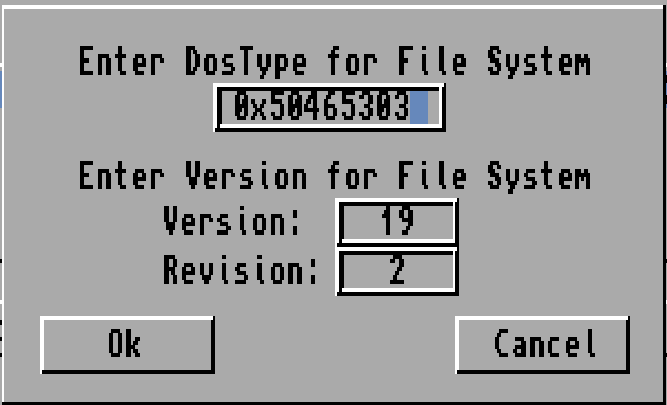
OK

OK
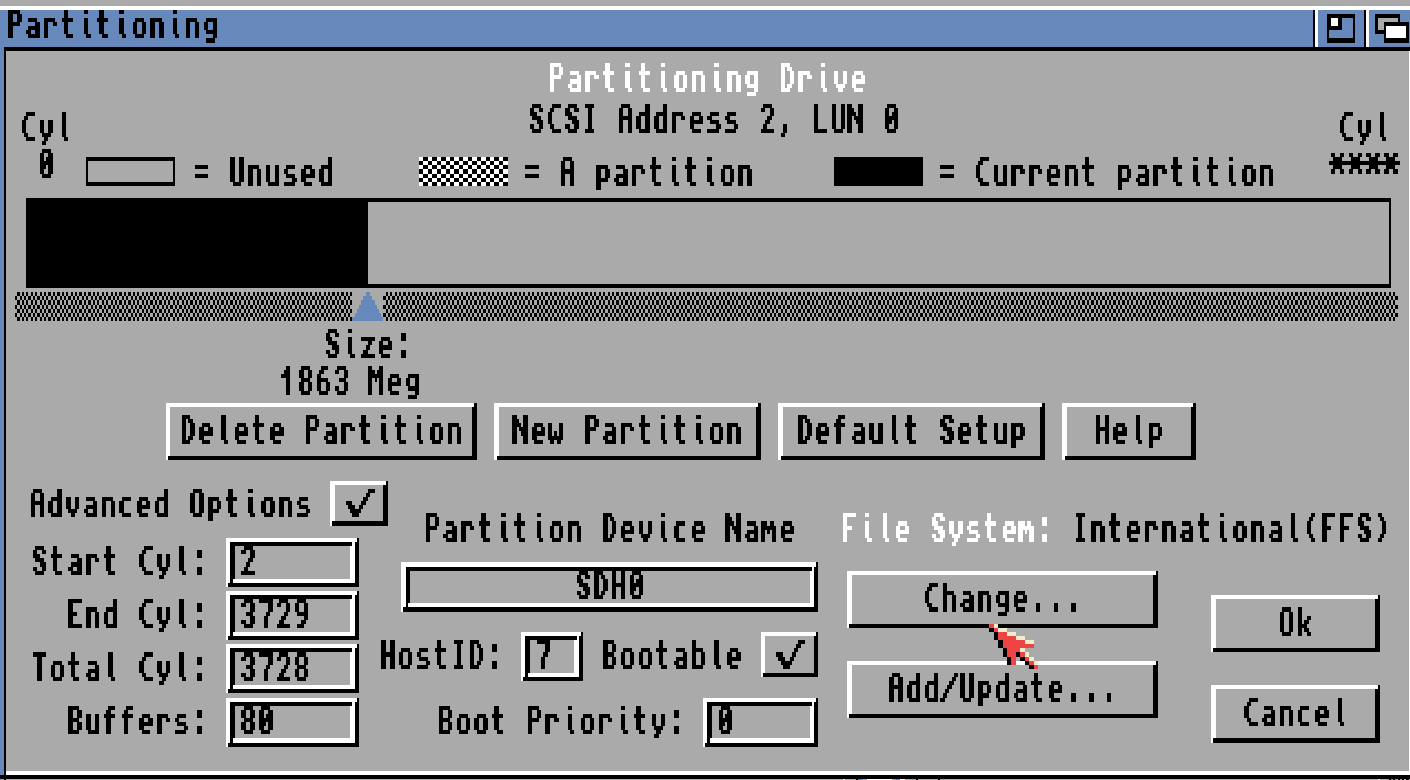
Now Click “Change”
You will be able to find PFS\03 choose that and blocksize, mask and maxtransfer as chosen above
OK
Save Changed to Drive
Continue
Exit
Continue
and your disk will look like:
Click on it. and then hold right mousebutton. in the menu choose icons->Format Disk

Choose a name and Quick Format.
“Format”
YES! Format
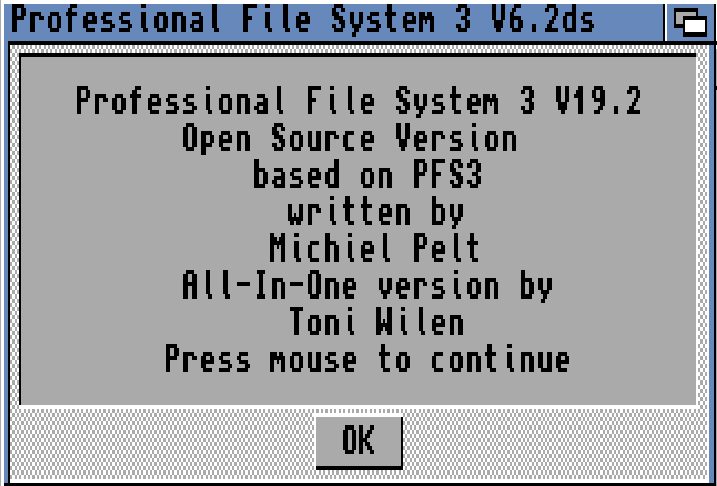
and OK” Done..
you now have a partition using PFS3AIO filesystem.
One thought on “A Complete guide of Physical HD / Diskimage in WinUAE”
-
Pingback: Installing WB 3.2 from ISO image in UAE. | John "Chucky" Hertell